Sign in for a more personalised experience
Unlock a more personalised experience to discover special offers, suggested products and more!
Sign inDon’t have an account? Click to sign up today!A Bloody Investigation!
I have yet to meet a year 6 child who isn’t fascinated by blood, whether it’s to do with picking a scab or wondering why it’s red.
This was part of my work as science coordinator at Phoenix Primary. The year 6 have just finished their topic on the circulatory system and before moving on their teacher was keen to do a practical lesson around the topic of blood.
This was a team teaching lesson which we encourage at Phoenix and the year 6 teacher and LSAs were all equally excited to take part in the investigation, too.
Coming from a foundation stage background, I immediately started thinking how I could adapt this for younger children, but more of that later.
We worked with the learning objective from the year 6 curriculum which covers blood:
L.O: Identify and name the main parts of the human circulatory system, and describe the functions of the heart, blood vessels and blood.
Length of activity
This can take up to 50 minutes. This can be extended if you want to complete the floor/ work book exercise.
What you will need:
- Newspaper to cover the desks as red food colouring often stains.
- Plastic protective gloves for the children.
- Small plastic bottles, if children are making one themselves or working in a pair. (Larger bottles if working in a group of 4 or more.)
- 1 Measuring jug or measuring cylinder per group.
- Pipettes – 1 per group
- Funnel – 1 per group
- Pictures of main components of blood, labelled if need to differentiate, description of the function of the main components of blood and the percentage of these in the blood, again, differentiated by leaving some words out or writing a full description. These can be a mixture if your children are working in mixed ability group.
- Water for each bottle to be 2/3 full
- 1 bottle of yellow food colouring per class to create the colour of plasma. N.B: It is worth investing in school catalogue food colouring as supermarket ones can be weaker. (If you use supermarket ones you may need more than a few drops.)
- 1 Bottle of red food colouring per group
- A pinch of salt, this represents the minerals and chemicals present in the blood. (For an extension the high ability child could research what chemicals these are.) Pinch of salt can be changed to an identified weight, reinforcing the link between maths and science.
- Small white marshmallows-(available from most supermarkets and used to represent the white blood cells, approx. 10 each bottle).
- Small purple pompoms to represent platelets, approx. 5 per bottle
- Cheerio type cereals, about a bowl full, this represents the red blood cells when the food colouring is added
- 1 Large strong zip plastic bag per group.
- Sticky labels for use when blood is complete in the plastic bottles. (optional)
The children were in mixed ability groups writing down what they could remember about blood. Absolutely anything at all, no right or wrong answers at this stage. The more able children were writing for the children who struggle with writing activities and post its were used so the children could manage the activity independently. These were then stuck straight into the floor books we are trailing in years 1 and 6. Lots of discussions, talk, debate and arguments going on -all great science discussions! At this point the teachers and support staff were mere observants.
Step 1.
Start with a round robin of “let’s talk about what you remembered?” the children were asked to complete a matching activity which involved reading definitions of blood components eg, plasma with the correct definition. Some groups were supported by an EAL teaching assistant and another group had pictures of the components to aid their matching. The groups presented their findings in floor books with staff moving around to correct any misconceptions and ensuring the correct matches.
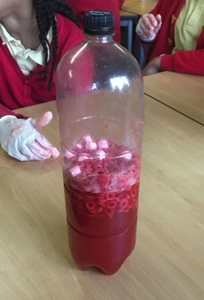
Groups identified equipment needed for the investigation with staff ensuring the correct vocabulary. Firstly they needed to make the plasma, fill the plastic bottle approximately ¾ full. Place 6 drops of yellow food colouring into the bottle of water. Add a pinch of salt to show the minerals that are present.
Step 2.
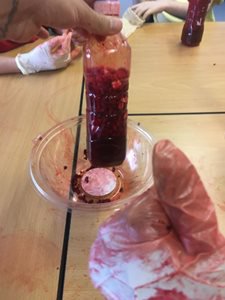
Then comes the bloody bit when we added the red blood cells. Place 2 cups full the of cheerio type cereal. Put into a large plastic zip type bag and the children added a whole bottle of red food colouring-gloves were provided.
Throughout the session staff were asking questions and passing on information as well as addressing any misunderstandings. Be sure you will get lots of comments about the gory nature of the experiment!
Step 3.
Ensure the cereal is covered in red food colouring by shaking the bag-ensuring it is tightly closed-gloves are a must here! Add about 20 mini white marshmallows to act as the white blood cells, again asking children questions to ensure they remembered the role and function of each component of blood. Take a look at how it should look like here.
Step 4.
Next put 6-8 small purple pompoms into the plastic bottle. You now have a bottle of blood!
Children were enthused and excited and were able to remember the components of blood and their functions. Expect a noisy session, but a rewarding one!
Adapting for other year groups
I mentioned above how I would adapt it for younger children. I would certainly use some of the science vocab around blood, but wouldn’t necessary talk about the function in such detail. I plan to do this with our foundation stage later on in the term. Confident they will love it!
By Sue Evans, Science Coordinator at Phoenix Primary
Hear from us
Curriculum changes. New materials. Price discounts and unmissable offers. We’ll make sure you don’t miss a thing with regular email updates, tailored by subject and age group.